Mac

Komma CSV

Minimalist CSV editor

What do you need help with?

Topics

Getting started

Read full article

Komma CSV is a minimalist CSV editor for Mac. Edit cell contents, find and replace text, and sort complete rows.

Open a CSV file

  1. Choose File → Open… or press ⌘O.
  2. Select a CSV, TSV or text file.
  3. Check the columns and the Header row setting after opening.

Komma detects commas, semicolons, tabs or pipes as separators. Without an Excel separator directive (sep=), detection uses the first non-empty record. For other or ambiguous formats, choose File → Import CSV with Options… and check the preview.

When opening or importing a file, Komma CSV checks cell contents for leading or trailing whitespace. If found, a prompt shows the number of affected cells. Keep Unchanged preserves the contents. Remove Whitespace removes leading and trailing spaces, nonbreaking spaces, tabs and line breaks, including in headings. Whitespace within the content stays unchanged. A cell containing only whitespace becomes empty. Use ⌘Z to undo the entire correction. The prompt appears once per opened document; reopening the file checks it again.

Work in the table

Click a data cell to edit its contents directly. The column bar stays visible while scrolling vertically. It uses the same background as ordinary cells, with bold titles.

Click a column title or row number to select that column or row. Click once again to deselect it. Selected columns and data rows reveal an ellipsis menu button and a drag handle. Double-click to select and open the corresponding menu immediately.

The footer on the right shows data row and column counts and, when applicable, the selected row count. With Header Row enabled, Rows: 5+1 means five data rows plus one header row – six rows in total. Without a header it shows the total directly.

The active cell position appears on the left. With a header it includes the column name, for example “Row 3, column 2 (Product)”. Both numbers start at 1 and the header counts as a row here. Dashes appear when no cell is active. An active sort is also shown in the footer.

The arrow beside a column title cycles through ascending, descending and original order. The column menu provides additional structure, validation and cleanup commands.

Choose Fit Column Widths in the Columns toolbar menu or Table menu to fit all columns to current headings and values once. Very long values receive a limited width. Later edits do not resize columns automatically. This only changes the view and does not create a copy.

Choose Window → Fit Window to Table to resize the window to current column widths and row count. It stays within the usable screen area; large tables still scroll. Opening a saved file performs this once automatically if the required window width is smaller than the usable screen area.

Start a new document

Choose File → New or ⌘N. An empty document starts with one column. Use + to add rows. For more columns, choose Table → Add Columns… or the same command in the Columns toolbar menu. Set the number of new columns and click Apply Changes. For example, add three new columns for a total of four.

In an empty document this creates an empty first row. Enter your headings there and use + to add data rows. Turn Header row off if the first row already contains data. Until the document has been saved, you can add, delete and move its columns directly. Use ⌘Z to undo changes. Save the document with ⌘S under a suitable name.

To enter or change headings with Header Row enabled, click a column title and press Return, or choose Edit Column Heading from its menu.

Open CSV files by double-clicking

On first launch, Komma CSV offers to open CSV files when you double-click them. Choose Set as Default App for CSV or Not Now. Closing the offer also skips this step; it will not appear on every launch.

You can change the association later in Komma CSV → Settings… → CSV files using Set as Default App for CSV. Confirm any macOS prompt. Once the association is confirmed, Settings shows that Komma CSV is the default app. This affects CSV files; TSV and text files keep their existing associations.

If an error occurs, you can retry. Alternatively, select a CSV file in Finder, open Get Info (⌘I), select Komma CSV under Open with, then click Change All…. You can also use these steps to switch back to another app later.
Saving and file format

Read full article

Save your edits as CSV. A corrected copy created by Character Encoding Correction receives its own filename when first saved.

Save changes

Choose File → Save or press ⌘S. For a new document, choose a name and location. For an existing document, changes are saved to its file.

To keep the original when saving a corrected copy, choose a different name or location. Saving with an existing filename can replace that file.

What is preserved when saving

Without content changes, the original file bytes are preserved. After edits, Save uses the encoding, separator and quote style detected when opening or selected during import. The detected line-ending style and the settings for a BOM, an Excel separator directive and a final line break are taken into account. The exact use of quotation marks may change.

If new values contain characters that the source encoding cannot represent, saving stops with an error. Use File → Save CSV Variant… with UTF-8 or another Unicode encoding instead. Open the exported file if you want to continue working in that format.

Windows-1252 detection without an unambiguous marker is an assumption. If characters appear incorrectly, use import options and select the appropriate encoding.

Cells, rows and headers

Read full article

Edit contents directly in the table and manage rows using the toolbar.

Select rows and open their menu

Click a row number once to select the row. It turns yellow and its checkbox is checked. Click the same number once again to deselect it. You can still use the checkboxes directly to select several rows.

A selected data row shows a drag handle and an ellipsis button (⋯). Click the ellipsis to open its menu. Double-clicking the row number selects the row and opens the menu immediately, even if the row was already selected. Right-clicking also opens the menu.

The row menu moves the selected data rows up or down. If the first row is defined as a header, it stays at the top: it has no drag handle and its move commands are disabled.

Multiple selection: Hold Shift and click another row number to select the range between your anchor and the clicked item. Further Shift-clicks can expand or shrink that range. Command-click adds or removes individual items. Command-Shift-click adds a range to the existing selection.

An unmodified click replaces a multiple selection with the clicked item. If it is already the only selected item, the click deselects it. Checkboxes still toggle independently; Shift-clicking a checkbox also selects a range. Dragging a selected row handle moves all checked data rows together.

The row menu also offers Change Case for uppercase or lowercase. With a multiple selection, all cells in the selected data rows are processed together. Open the menu using the ellipsis on an already selected row or a right-click. A defined header row stays unchanged.

Set the header row

Use Header row in the toolbar to choose whether the first row supplies the column headings. This setting is initially enabled when opening a document.

Toggling it does not insert a row or remove data. When enabled, the first row stays in place during sorting. To edit a heading, open its three-dot or right-click menu and choose Edit Column Heading. Alternatively, select the column heading with a single click and press Return. A double-click opens the column menu.

Add or insert rows

Click + to append an empty row. Open the menu beside the plus symbol for more options:

  • Insert Row at Top inserts a row just below the header, or at the very beginning if there is no header.
  • Insert Above Selection inserts a row before the topmost checked row. This option appears only when rows are selected.

New rows have as many cells as the widest row in the document.

Delete rows

  1. Check the boxes on the left of the rows you want to delete.
  2. Click the Delete Selected Rows trash button.

The trash button appears when at least one row is selected. A manually checked header row can also be deleted. Press ⌘Z to undo the deletion.

Move rows

First select the row by clicking its number or checkbox to reveal its drag handle.

Using drag and drop: Drag the small three-line handle beside a row number onto the desired target row. Moving upwards inserts before the target; moving downwards inserts after it. The target row is outlined during the drag. If the dragged row is checked, all checked data rows move together, preserving their relative order. A header row cannot be dragged or used as a target. Dragging between document windows is not supported.

Using the keyboard or menus:

  1. Check the rows you want to move. You can select adjacent or separate rows.
  2. Choose Table → Move Rows Up or Move Rows Down. These commands are also in the menu beside + and in the context menu when you right-click a row number.
  3. Repeat until the rows reach the desired position. Each command moves the selection by one row, keeping the selected rows in their relative order.

If no rows are checked, the Table menu uses the active cell’s row. An enabled header row stays at the top and cannot be moved. A command is disabled when the selection reaches that edge of the table.

Rows move in the current document. This clears the previous column sort and its saved baseline order. ⌘Z undoes the move; ⇧⌘Z redoes it. If you sort again afterwards, the manual order becomes the new baseline.

Find and select

Read full article

Use checkboxes to select entire rows. A search condition can set this selection automatically.

Select matching rows

  1. Open search with ⌘F.
  2. Enter text or a regular expression.
  3. Optionally choose one column and enable Aa for case-sensitive matching.
  4. Click Find and Select.

All matching data rows are checked, replacing the previous selection. The header row is always excluded, even when the search includes headings. No matches clears the selection. An empty or invalid expression leaves it unchanged.

Other rows remain visible. If you change the search text, click Find and Select again to update the checkboxes.

Understand colours and selection

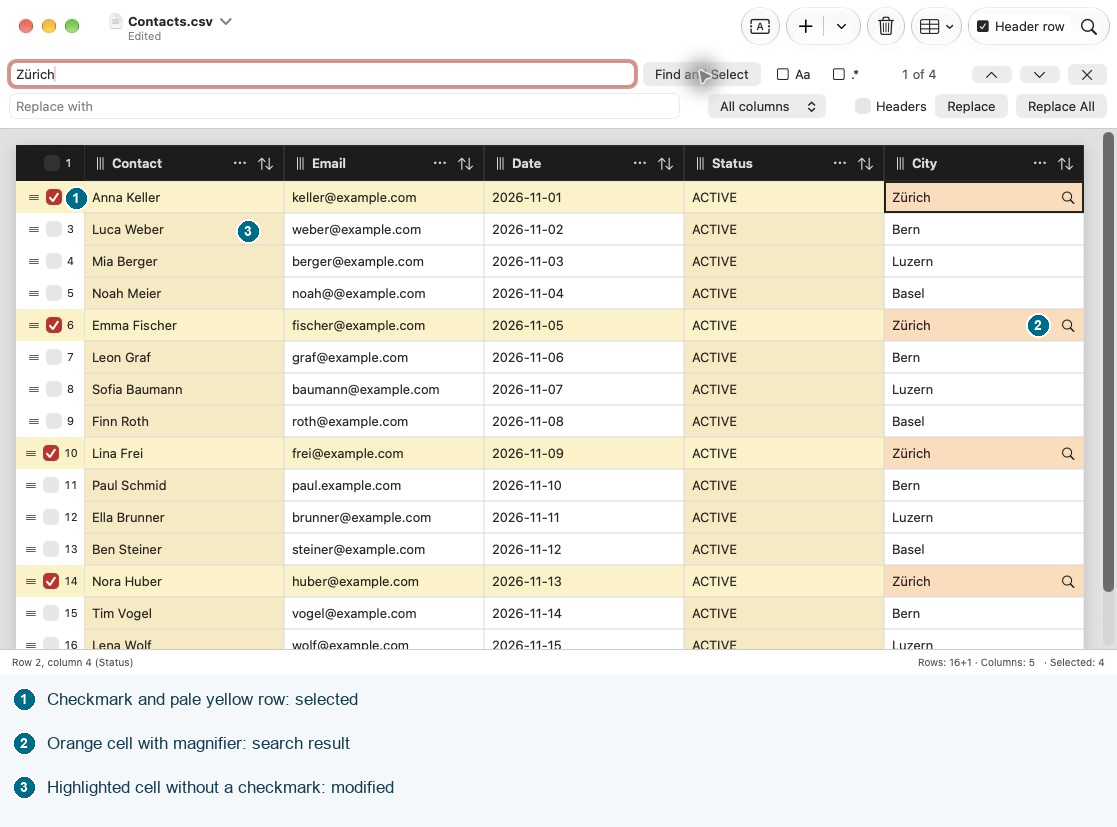
Selected rows have a pale yellow background in light appearance. Cells containing search matches are highlighted in orange while search is open; the current match has a coloured outline. Match highlighting takes precedence over selection highlighting. Edited cells are also marked. Dark appearance uses darker versions of these colours.

Closing search keeps the checkboxes selected. You can change them individually or use the selection to delete rows or limit character encoding correction.

Search for Zürich: checked rows are pale yellow and matches in the City column are orange. Luca Weber’s modified name cell is highlighted without selecting the row.
Selection, search results and modified cells use different highlights. The numbers identify an example of each.

Find and replace

Read full article

Search for text across all columns or limit the search to one column.

Find and browse matches

Open Find and Replace with the magnifying glass, Edit → Find and Replace…, or ⌘F. Enter text in Find. Matching is case-insensitive by default; enable Aa to distinguish upper and lower case.

Choose All columns or one specific column. Enable Headers in the search area to include column headings. Use the arrow buttons, ⌘G and ⇧⌘G to move to the next or previous match. The counter counts individual matches, not rows. Click the magnifying glass again to close the search area. You can also close it using the cross or Esc while in the search area. ⌘F opens search or focuses the search field if it is already open.

Replace one match or all matches

Enter the new text in Replace with. Replace changes the current match; Replace All changes every match in the chosen search scope in one step. An empty replacement removes the matched text.

Checked rows do not limit replacement. The search text, column choice and header option determine its scope. Check those settings before using Replace All. Press ⌘Z to undo the entire operation.

Use regular expressions

Read full article

Use copyable examples to find text, numbers or empty cells. No previous experience with regular expressions is needed.

Use RegEx for the first time

A regular expression, or RegEx, is a search pattern. It can find empty cells or product codes with a particular structure. For a simple name, ordinary text search is usually enough.

  1. Open search with ⌘F.
  2. Enable the .* button.
  3. If possible, choose the column you want to search.
  4. Copy a pattern below into Find, without the surrounding code formatting. Do not add slashes /…/.
  5. Check the highlighted cells. Use the arrows to move between matches.
  6. Click Find and Select if you want to check the matching rows.

Each cell is checked separately. A pattern does not search across columns or table rows. Aa distinguishes uppercase and lowercase letters; with Aa off, Berlin and berlin are treated alike. Automatic selection always skips the header row. Other rows remain visible.

Searching does not change your data. Only Replace or Replace All applies a replacement.

Find specific text, beginnings and endings

An exact cell value

Find: \ABerlin\z

Matches Berlin, but not Berlin Mitte. \A means the start of the cell and \z its end. Spaces are part of the value: Berlin does not match.

Either of two values

Find: \A(Berlin|Zürich)\z

Matches Berlin or Zürich, but not Zürich West. The vertical bar | means “or”.

A particular beginning

Find: \ARE-

Matches RE-1042, but not ALT-RE-1042.

A particular ending

Find: @example\.com\z

Matches anna@example.com, but not anna@example.com.ch. This checks only the ending, not whether the entire email address is valid.

Find numbers and product codes

Digits only

Find: \A[0-9]+\z

Matches 123 and 0012, but not 12a, -12 or an empty cell. [0-9] means a digit; + means one or more of them.

A simple number with an optional minus sign and decimal part

Find: \A-?[0-9]+([.,][0-9]+)?\z

Matches 12, -12, 12,50 and 12.50. Does not match CHF 12, 1 234,50 or 1.234,50. A ? makes the preceding part optional. This pattern is intended for numbers without thousands separators; 1.234 is treated as a decimal number.

A product code with a fixed structure

Find: \A[A-Z]{2}-[0-9]{4}\z

Matches AB-0123, but not A-123 or AB-12345. {2} means exactly two characters and {4} exactly four. Enable Aa if only uppercase letters are allowed. With Aa off, ab-0123 also matches.

Find empty cells and unwanted spaces

A completely empty cell

Find: \A\z

Matches an empty value, but not a cell containing a space. Choose a particular column and click Find and Select, for example to check rows without a customer number. A cell that is entirely absent from a shorter CSV row is not searched.

Empty or containing only whitespace

Find: \A\s*\z

Matches empty cells and cells containing only spaces, tabs or line breaks. \s means such whitespace characters; * also allows zero of them. Text does not match.

Ordinary spaces at the edges

Find: \A[ ]+|[ ]+\z

Matches the spaces in Berlin , but not the single space inside Berlin Mitte. To remove them, leave Replace with empty. Try Replace on one match first. For whitespace, the whole-cell highlight may be easier to see than the invisible character itself.

Find periods and other special characters

Some characters have a special meaning in RegEx. For example, a period . stands for any character except a line break. Put a backslash \ before it to search for the character itself.

  • Find: \. matches the period in 12.50, but not the comma in 12,50.
  • Find: \(alt\) matches (alt) in Name (alt), but not just alt.
  • Find: \+ matches the plus sign in A+B.

The characters *, ?, [, ], (, ), {, }, ^, $, | and \ also have special roles. To find text containing these characters literally, turn off .*. Enter each backslash only once in the search field, for example \..

Find line breaks inside a cell

Find: \r\n|\r|\n

Matches a line break inside a cell, for example between a street and city in a multiline address. It does not match the normal boundaries between table rows.

To replace the matched line break with a space, enter exactly one space in Replace with. An entirely empty replacement would join the text without a gap. Try the change on one match first.

Reformat a date: reuse matched parts

Parentheses can capture parts of a match. In the replacement, $1 inserts the first group, $2 the second, and so on.

Example: turn 2026-10-13 into 13.10.2026.

  1. Choose the date column and enable .*.
  2. Find: \A([0-9]{4})-([0-9]{2})-([0-9]{2})\z
  3. Replace with: $3.$2.$1
  4. Check a match and click Replace.
  5. If the result is correct, you can use Replace All.

The first group holds the year, the second the month and the third the day. This pattern only reformats the text; it does not check whether the date is valid. 13.10.2026 and 2026-1-3 do not match the search pattern.

Checked rows do not limit replacement. The column choice and header option define its scope. Use ⌘Z to undo a replacement; Replace All can also be undone as a single step.

When a pattern does not work as expected

  • First check that .* is enabled and the correct column is selected.
  • Turn off Aa to treat uppercase and lowercase letters alike.
  • Copy the whole pattern. Missing parentheses or backslashes can change its meaning or cause an error.
  • An empty search field does not run a search. To find empty cells, use \A\z.
  • The match counter counts occurrences, not rows. A row can have several matches but still receive only one checkmark.
  • After changing the pattern, click Find and Select again to update the checkmarks.
  • An invalid pattern changes neither data nor the existing selection. A valid pattern with no matches clears the checkmarks when you select matches.

If you are unsure, start with ordinary text search and .* turned off. Find and review matches first; you do not need a replacement to find or select.

Sort and restore row order

Read full article

Click a column’s arrow button to cycle through ascending, descending and unsorted.

Sort with one click

Click the arrow button on the right of the desired column heading. Each click advances to the next state:

  1. Ascending: a bold upward arrow.
  2. Descending: a bold downward arrow.
  3. Unsorted: both arrows; the original order is restored.

Clicking another column starts it in ascending order. No menu opens. Komma CSV always uses natural text sorting: for example, A2 comes before A10. Decimal numbers, signs and currency amounts are not interpreted as mathematical values.

Sorting moves complete rows so related values stay together. It affects all data rows regardless of their checkboxes. An enabled header row stays at the top. Empty values stay at the bottom in either direction. Equal values retain their previous relative order.

For keyboard access, use Sort A–Z and Sort Z–A under Table → Sort Current Column. Right-click a column heading to insert, delete or move that column.

Return to the original order

Click the active column’s sort button until both arrows appear, or choose Table → Restore Original Order. Komma CSV restores the order before the first actual reordering in the currently open document, even after multiple sorts.

  • Later cell edits are preserved.
  • Deleted rows stay deleted.
  • Rows inserted while the order differs from the original are appended at the end.
  • Rows inserted after restoring the order retain their insertion position in the baseline.

The baseline is kept only for the current session. After closing and reopening, the saved file’s order becomes the new starting point. You can also undo a restoration with ⌘Z.

Manually moving rows up or down ends this sort and clears its saved baseline order. Use ⌘Z to undo the move. A subsequent new sort uses the manual order as its baseline.

Undo and redo

Read full article

Each open document has its own editing history.

Undo or redo edits

Choose Edit → Undo (⌘Z) or Edit → Redo (⇧⌘Z). This works for cell edits, inserting and deleting rows, replacements, sorting and restoring the original order. Replace All is undone as one operation.

Making a new edit discards previously undone steps from the redo history. A command is disabled when no step is available. Undo and redo clear the row selection. They also update the contents that will be written on the next save.

Manual row moves can also be undone and redone.

In documents that have not been saved yet, this also covers adding, deleting and moving columns.

What is outside the editing history

Checking rows and using Find and Select change only the selection and do not create an editing step. Toggling the header row also leaves CSV data unchanged.

History is not stored in the CSV file and starts fresh after reopening. Reloading the document with different file contents resets history and highlighting. Character encoding correction creates a separate document and does not add an edit to the original.

For saved files, column changes create a copy. They do not change the original or add an undo step to it. Close the copy if you do not want to keep the change. Until a new document or copy has been saved, further column changes are applied directly and are included in its undo history.

Character encoding correction and BOM

Read full article

If text appears as Zürich instead of Zürich, it may have been read using the wrong character encoding. Komma CSV offers possible corrections for you to review.

Review and select corrections

  1. Optionally check the affected rows first.
  2. Open Edit → Character Encoding Correction… or click its toolbar icon.
  3. Compare Before with Correction (editable).
  4. Check or uncheck individual suggestions. You can edit the proposed text directly.

If rows are selected when you open the dialog, Only selected rows is initially enabled. Without this restriction, the entire document, including the header, is scanned. Select All Suggestions selects every changed proposal; Deselect All clears their checkboxes. Review ambiguous suggestions before applying them.

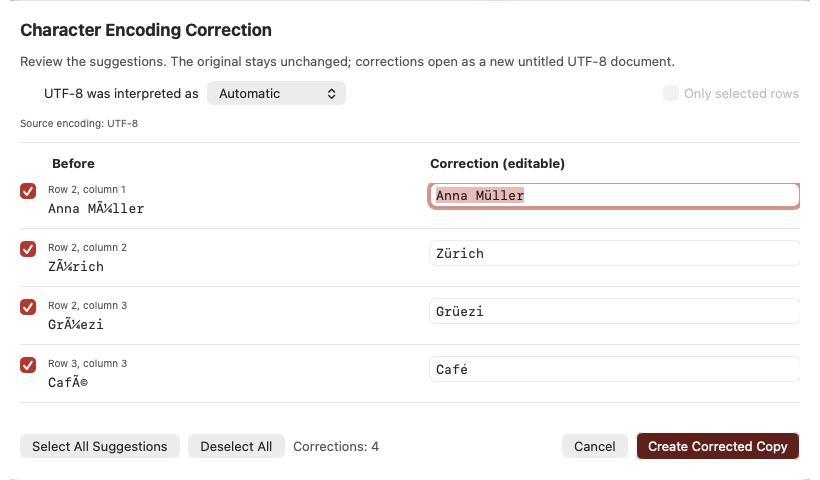
Character Encoding Correction with four checked suggestions: damaged text on the left and editable corrections Anna Müller, Zürich, Grüezi and Café on the right.
Compare Before and Correction side by side. Use the checkboxes to choose which suggestions go into the corrected copy.

Choose the appropriate encoding

Start with Automatic under UTF-8 was interpreted as. Automatic correction checks common Windows-1252 and ISO-8859-1 mix-ups. If needed, select an encoding explicitly, such as Mac Roman.

If the source file was opened using an assumed Windows-1252 encoding, an additional Original file encoding selector appears. Use it to reinterpret the original bytes as, for example, Mac Roman.

Changing the encoding or row restriction recalculates suggestions and resets their selection and manually edited proposal text. Set these options first, then edit the suggestions.

Recognise lost characters and BOM issues

A BOM (Byte Order Mark) is a normally invisible marker at the start of a file that helps identify its Unicode encoding. If read incorrectly, it may appear as characters such as  at the beginning of the first cell. Conflicting or repeated markers can also cause problems. Komma CSV recognises several such cases and offers Normalize encoding / BOM in the new copy when applicable. For the save option, see Import and export CSV formats → Understand encodings and BOMs.

The replacement character � can indicate that the original information has already been lost. Komma CSV cannot reliably guess those characters. Review the flagged locations and enter the correct text yourself. No suspicious characters found does not guarantee that every value is correct.

Create a corrected copy

Click Create Corrected Copy. Komma CSV opens a new UTF-8 document with an initial name such as Untitled. Only checked proposals that actually change text are applied; correction leaves the source document unchanged. The copy includes the current table contents, including any edits already made.

Press ⌘S to choose a separate filename and location. If only encoding or BOM normalization is required, you can create a copy without individual text corrections. Cancel closes the review without creating a copy.

Appearance and language

Read full article

Komma CSV supports light and dark appearance, German and English.

Light, Dark or System

Choose View → Appearance, then System, Light or Dark. System follows the current macOS appearance. Your choice is saved for future app launches.

The table background, selection, search matches and edit highlights adapt to the chosen appearance.

Change the language

Komma CSV uses the app language selected by macOS. To override it, add Komma CSV under General → Language & Region → Applications in macOS System Settings and choose German or English. Restart the app if needed. The exact settings labels may vary with your macOS version.

Online help follows your browser’s language preferences, with English as the fallback.

Troubleshooting

Read full article

Start by checking the file structure, search options and header setting.

The CSV file will not open

If all values appear in one column or accented letters look wrong, try File → Import CSV with Options…. Adjust the separator, encoding and quotation style, then check the preview.

Komma reports malformed quotation marks with a row number, such as a missing closing quote or unexpected text after it. First check that the selected quotation style matches the file. Otherwise, correct damaged data in the source program or a text editor.

A field containing separators or line breaks must be enclosed in the selected quotation marks. A matching quote inside that field is doubled, for example "" for double quotes. With multiline fields, the reported CSV row can differ from the visible line number in a text editor.

If the file still cannot be opened with the appropriate encoding, export it again as UTF-8 CSV from the source program if possible. Character encoding correction in Komma CSV requires an open document.

Search, selection or sorting behaves unexpectedly

  • For missing matches, check Aa, .*, the selected column and the header option.
  • Search does not hide rows. Find and Select sets checkboxes and must be triggered again after changing the search condition.
  • Automatic selection always excludes the header row.
  • Sorting and replacement are not restricted to checked rows.
  • Sorting uses natural text order (A2 before A10), not mathematical values such as decimal amounts.
  • If the first data row is displayed as headings, turn off Header row.

Import and export CSV formats

Read full article

Match the file format to the program that produces or consumes your data.

Choose an import format

  1. Choose File → Import CSV with Options….
  2. Click Choose File….
  3. Start with Automatic encoding. If accented or other letters look wrong, choose the encoding used by the source program.
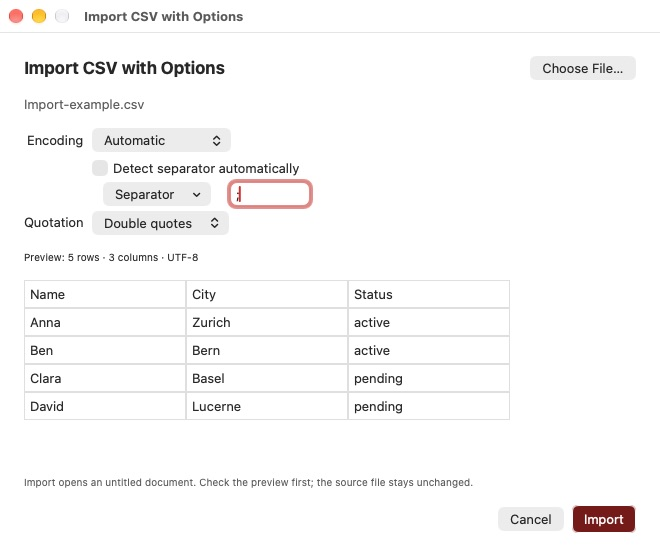
  4. If several values appear together in one column, turn off Detect separator automatically. Choose the correct separator or enter exactly one custom character.
  5. Choose the quotation style used in the file: double quotes, single quotes or no quotes. Double quotes are suitable for ordinary CSV files.
  6. Check the first eight rows in the preview and click Import.

Import opens a new untitled document and leaves the source file unchanged. Press ⌘S to save the new document under its own name.

Import dialog with automatic separator detection turned off and a semicolon selected. The preview shows five rows split correctly into three columns.
The correct separator produces the expected columns in the preview. Check them before importing; the source file stays unchanged.

Save a CSV variant

Choose File → Save CSV Variant…. The dialog starts with the open document’s settings. Use Preset offers CSV/UTF-8, Excel with comma or semicolon and a UTF-8 BOM, Excel Unicode with UTF-16 LE and tabs, TSV, Windows-1252 and Classic Mac. You can then adjust every setting.

Click Save… and choose a filename and location. The entire current table is exported, regardless of checked rows. The open document keeps its existing format settings. Choose a different filename if you want to preserve the original.

Understand encodings and BOMs

An encoding determines how text is stored in a file. UTF-8, for example, can store accented letters, international characters and emoji.

BOM stands for Byte Order Mark. Think of it as a small, normally invisible label at the very beginning of a file: it helps a program recognise the Unicode encoding. For UTF-16 and UTF-32, it also identifies the order of the stored bytes. It is not one of your table values and does not add a row or column.

When do I need it? A BOM is optional for UTF-8. Under File → Save CSV Variant…, select Include BOM if the receiving program needs this marker. The Excel presets already include the appropriate setting. If an import explicitly requires “UTF-8 without BOM”, leave the option off. A BOM does not repair text that is already damaged; use Character Encoding Correction for that.

Import and export support:

  • UTF-8
  • UTF-16 LE and BE
  • UTF-32 LE and BE
  • Windows-1250, Windows-1251 and Windows-1252
  • ISO-8859-1 and ISO-8859-2
  • Mac Roman
  • Shift JIS and EUC-JP
  • ASCII

Include BOM is available for Unicode encodings. UTF-16/32 without a BOM is detected automatically only when there is enough evidence; otherwise select it manually. Legacy encodings often cannot be identified unambiguously. Check the preview, especially accented and other non-ASCII characters.

Separators, quotes and line endings

The separator divides a row into individual values. TSV means a table with tabs as separators.

The separator can be a comma, semicolon, tab, pipe, colon or one custom character. Double or single quotation marks inside a quoted field are escaped by doubling them. Quote all fields also encloses fields that contain no special characters.

Choose LF for Unix/macOS, CRLF for Windows or CR for Classic Mac. Final line break controls the end of the last row; line breaks within cell contents are preserved.

Without quotes, cells containing separators or line breaks cannot be exported unambiguously. Komma CSV rejects those combinations with an error. An empty final row without a final line break also requires quotes.

Excel and sep= directives

The Excel presets combine suitable encodings, BOMs and Windows line endings. If the receiving program requires it, enable Excel separator directive (sep=). Komma CSV then adds a line such as sep=; before the data. On import, Komma CSV recognises this complete first line as format metadata.

Not every program understands this Excel convention; others may display the line as data. The option is therefore initially disabled in the presets. Quote an actual first data cell such as sep=; to distinguish it from a directive.

Accessibility and keyboard

Read full article

Use Komma CSV with the keyboard or VoiceOver and adjust text size, contrast and motion to suit your needs.

Work without a mouse

  1. Open a document and press ⌃⌘G (Control + Command + G) to focus the table.
  2. Tab moves to the next cell and Shift-Tab to the previous cell, including across row boundaries.
  3. Return or Down moves to the next row in the same column. Shift-Return or Up moves to the previous row. Left/Right still moves the text cursor.
  4. Escape leaves the table and focuses Find. Press Escape again to close Find and return to the last active cell. At the last cell, Tab moves to Find; at the first cell, Shift-Tab does the same.

Use the Table menu for row actions and Sort Current Column. Shift-Command-L selects or deselects the active row; Shift-Command-A selects all data rows, excluding the header. Shift-Command-N adds a row; Shift-Command-Delete deletes selected rows. Command-Z undoes changes and Shift-Command-Z redoes them.

Command-F opens Find; Command-G / Shift-Command-G move between matches. While Find is open: Option-Command-L finds and selects rows, Option-Command-C toggles case sensitivity and Option-Command-X toggles regular expressions. Option-Command-R replaces the current match; Shift-Option-Command-R replaces all matches. Native menus, dialogs and text fields remain accessible using macOS keyboard navigation.

The Table menu also provides Add Columns…, column commands for the active cell, and Move Rows Up/Down. This lets you change the structure without dragging with a mouse.

After clicking a column title, Left/Right selects a neighbouring column, Return edits its header cell (or first data cell without a header), Shift-F10 opens its menu, and Escape clears the column selection. After clicking a row number, Space toggles its selection, Shift-F10 opens its menu, and Return enters a cell in that row.

Enlarge text

Choose View → Larger Table Text or press Command-Plus. Command-Minus decreases the size; Command-0 resets it. Under Komma CSV → Settings → Accessibility, choose a size between 13 and 32 pt. This preference is saved across launches and applies to all document windows. Row heights and column widths grow with the text. Large tables can still be scrolled horizontally and vertically.

Work with VoiceOver

VoiceOver is the screen reader built into your Mac. Turn it on under System Settings → Accessibility → VoiceOver. Then open a document in Komma CSV and press Control-Command-G to start editing the table.

VoiceOver announces the cell value, row, column and column heading where available. It also identifies header cells, selected rows, search matches and modified cells. Press Tab to move to the next cell. VoiceOver cell actions also offer Next cell, Previous cell and Select or deselect row.

When VoiceOver announces a group or scroll area, start interacting with VO-Shift-Down Arrow. VO-Shift-Up Arrow leaves that area. VO means your VoiceOver modifier; with the default settings, you can use Control-Option. Activate a focused button with VO-Space. See Apple’s VoiceOver interaction commands for more guidance.

Moving between search matches announces their position and value. Komma CSV also announces the number of replaced matches and completion of sorting, undo and redo. Character encoding correction identifies the original value and proposed correction by row and column. An invalid regular expression is announced as an error while Find is open.

Colors, contrast and orientation

Under Komma CSV → Settings → Appearance, choose System, Light or Dark. System follows your Mac’s appearance.

To make grid lines and controls easier to distinguish, open System Settings → Accessibility → Display and enable Increase contrast. Komma CSV then draws stronger grid lines. This also works when you explicitly choose Light or Dark in the app. Reduce transparency in the same system settings can provide more solid surfaces.

A magnifying glass marks search matches. Selected rows have a checkbox, and the current match has an outline. Modified cells have a yellow background. Editing a cell shows neither a pencil icon nor an additional focus ring. VoiceOver continues to identify modified cells.

Reduce motion

If animated transitions bother you, enable Reduce motion in System Settings → Accessibility. Depending on your macOS version, the switch is under Motion or Display.

Komma CSV follows this setting automatically and suppresses animated transitions in its interface. While waiting for confirmation of the default-app association, it shows a stationary hourglass with a status message instead of a spinning indicator. No additional setting is needed in Komma CSV.

Columns and table structure

Read full article

Add, delete, split, and move columns while protecting saved originals with copies.

Select columns and open their actions

Click a column title once to highlight the entire column in yellow. Click it once again to deselect it. Each selected column shows its drag handle and ellipsis button (⋯). The sort arrow is always visible and controls sorting separately.

Double-clicking a column title selects it and immediately opens its menu. The ellipsis and a right-click open the same menu. It contains structure commands, Validate Column, whitespace and line-break cleanup, nonbreaking spaces and Change Case. Change Case includes other selected columns when you open the menu on a selected column. Other actions target the column whose menu you opened. Checked rows do not limit these column actions.

To edit an existing heading, choose Edit Column Heading or press Return after clicking its title. Without an enabled header row, the column bar shows generated labels. Clicking a data cell clears the column selection and begins editing.

Multiple selection: Hold Shift and click another column title to select the range between your anchor and the clicked item. Further Shift-clicks can expand or shrink that range. Command-click adds or removes individual items. Command-Shift-click adds a range to the existing selection.

An unmodified click replaces a multiple selection with the clicked item. If it is already the only selected item, the click deselects it. Change Case includes all selected columns. Other menu commands and the drag handle still act on that specific column.

Why a copy?

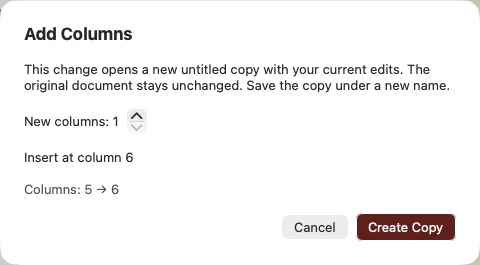
Columns define a CSV file’s structure. For an already saved file, adding, deleting, splitting, or moving columns therefore opens a new untitled copy. It includes the current table contents, including unsaved cell edits. The operation does not change the original document. Review the change in the dialog and click Create Copy.

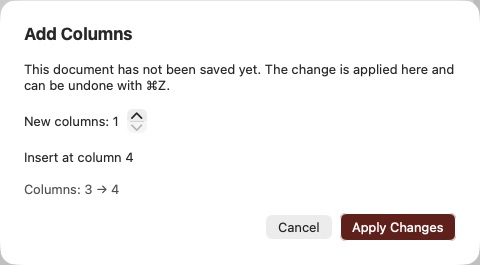
Documents that have not been saved yet are changed directly. This applies both to new files and to freshly created copies. The dialog offers Apply Changes in this case. Further column changes do not open additional windows and can be undone with ⌘Z.

Save the copy with ⌘S under a new name. After this first save, the next structural change creates a copy again. Cancel leaves everything unchanged. A new copy starts without an active sort or the original’s editing history. Moving rows, by contrast, changes the current document even if it has already been saved.

Add Columns dialog for a saved file, explaining that a new untitled copy will open and offering a Create Copy button.
Saved file: the structure change opens a new copy containing your current edits. Save it under a new name.
Add Columns dialog for an unsaved document, with an Apply Changes button and a note about undoing with Command-Z.
Unsaved document: Apply Changes updates the current table. Use ⌘Z to undo the change.

Add or delete columns

To append columns, choose Table → Add Columns… or use the Columns toolbar menu. You can add 1 to 100 empty columns per operation.

To choose a position, right-click a column heading and choose Insert Column Before… or Insert Column After…. To remove a column, choose Delete Column… there. The dialog identifies the column. For a saved file, Create Copy removes its heading and values only from the new copy. For an unsaved document, Apply Changes changes the document directly and can be undone with ⌘Z.

At least one column must remain; the last column cannot be deleted. For CSV rows of different lengths, missing cells are filled with empty values. Existing values remain attached to their columns.

Split a column at its first whitespace

Use Split Column… to separate a value such as “Anna Maria Smith” into “Anna” and “Maria Smith”.

  1. Open the desired column’s ellipsis menu or right-click menu and choose Split Column…. Alternatively, click a cell in that column and use the command in Table or the Columns toolbar menu.
  2. Read the dialog. Choose Create Copy for a saved file, or Apply Changes for a new or still-unsaved document.
  3. A new column appears immediately to the right of the original column. Other columns shift right.

Each cell is split at its first consecutive run of whitespace. This includes ordinary and nonbreaking spaces, tabs, line breaks and other Unicode whitespace. Consecutive whitespace characters form a single separator and are removed. Text before it stays in the original column; text after it goes into the new column. Later spaces and line breaks remain unchanged. For example, “Anna Maria Smith” becomes “Anna” and “Maria Smith”.

Cells without whitespace stay unchanged on the left, with an empty cell on the right. Leading whitespace gives an empty left part; trailing whitespace gives an empty right part. A whitespace-only cell becomes two empty cells. An enabled header row follows the same splitting rule. If a heading contains no separator, the new heading is empty and can be edited afterwards.

If no cell in the chosen column contains whitespace, a message explains that no new column will be created. The action targets that one column and all its rows; other selections do not restrict it.

For a saved file, the original stays unchanged and a new untitled copy includes your current edits. Further structural changes in a document or copy that has not been saved yet are applied directly there. Command-Z undoes the whole split in such a document; Shift-Command-Z redoes it.

Move columns

First select the column by clicking its title to reveal its drag handle.

Using drag and drop: Drag the handle with three vertical lines at the left of a column heading onto the desired target heading. The target column is outlined. The dragged column is inserted at that position and intervening columns shift accordingly. All values and the heading move together. For a saved file, the Create Copy dialog appears. In a document that has not been saved yet, the column moves directly; ⌘Z undoes the move. Dragging between document windows is not supported.

Using the keyboard or menus:

Right-click the desired column heading. Choose Move Column Left… or Move Column Right…. Confirm with Create Copy for a saved file, or Apply Changes for a document that has not been saved yet. The entire column, including its heading and all values, moves by one position. Row order is preserved.

Alternatively, click a cell in the column and use the commands under Table or in the Columns toolbar menu. The corresponding direction is disabled at the left or right edge. To move by several positions, repeat the command in the unsaved document or newly created copy. No additional copy is created until you save it.

Use nonbreaking spaces

A nonbreaking space looks like an ordinary space. In many applications, it prevents an automatic line break at that position, for example within “Anna Maria” or “10 kg”. Existing line breaks are not removed.

  1. Open the column’s three-dot menu (⋯) or right-click its heading.
  2. Choose Replace Spaces with Nonbreaking Spaces. The command is also available in the toolbar’s Columns menu and under Table, after clicking a cell in the desired column.
  3. The feedback shows the number of changed cells and the affected cell contents. Ordinary and nonbreaking spaces look the same; the list uses no special markers. The accompanying row numbers help identify each cell and include a header row if present.

The action replaces every ordinary space (U+0020) in the data cells of this column with a nonbreaking space (U+00A0), regardless of checked rows. The header, other columns, tabs and existing nonbreaking spaces stay unchanged. This changes cell contents only, so it does not create a structural copy. Use ⌘Z to undo the whole action and ⌘S to save the change.

Data Maintenance

Read full article

Use Data Maintenance to clean cell contents and validate column values.

Clean whitespace and line breaks

Check Surrounding Whitespace… repeats the opening check. If matches are found, you choose whether to remove them; otherwise a confirmation appears. The existing Character Encoding Correction… is also available here.

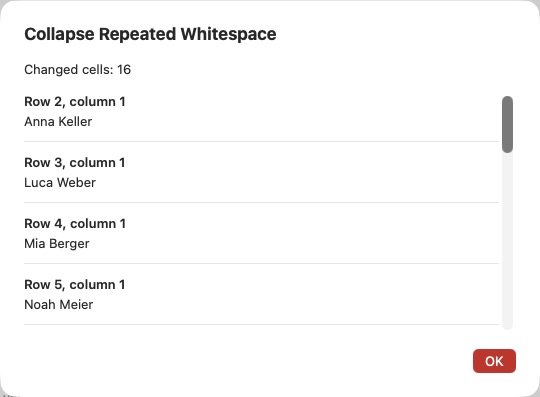
For Collapse Repeated Whitespace and Replace Line Breaks with Spaces, choose Entire Table or Active Column. Repeated whitespace inside a value becomes one ordinary space; leading and trailing whitespace is preserved by this action. The line-break action supports Windows, Mac, Unix and Unicode line breaks. Consecutive breaks become one space.

Both cleanup actions include headings. Feedback lists changed cell contents and their count. Undo each entire action with ⌘Z.

Report after collapsing repeated whitespace: 16 modified cells, showing cleaned names with their row and column numbers.
After cleanup, the report shows the modified values. Choose Entire Table or Active Column first in the Data Maintenance menu.

Directly for one column: Double-click its title or click the ellipsis on the selected column. Choose Collapse Repeated Whitespace, Replace Line Breaks with Spaces or Replace Spaces with Nonbreaking Spaces. The first two include the header cell; the nonbreaking-space action leaves it unchanged. Surrounding-whitespace checks and character encoding correction remain in Data Maintenance.

Validate column contents

Click a cell in the desired column, then select Data Maintenance → Validate Active Column → Email Addresses, URLs or Calendar Dates. A defined header row is excluded. Validation changes no values. The report lists the checked count, invalid or empty count, and affected contents with cell positions. Empty cells and missing cells in shorter rows are invalid.

Email addresses and URLs are checked locally for syntax; reachability, deliverability and existence are not checked. URLs require a scheme such as https://; www.example.ch alone is insufficient.

Calendar dates require a valid day, month and year, including leap-year checks. Common formats include 2026-10-14, 14.10.2026, 14/10/26, 10/14/2026, compact forms such as 20261014 and 14102026, and German or English month names such as 14. Oktober 2026, 14 Oct 2026 and October 14th, 2026. Ambiguous day/month orders pass if either interpretation is a valid calendar date; nothing is reformatted. Two-digit years 00–69 mean 2000–2069, and 70–99 mean 1970–1999. Partial dates, relative terms such as “tomorrow”, times alone and timestamps are not accepted as calendar dates. Unusual formats may be reported as invalid and should be reviewed.

Additional checks:

  • IP Addresses: IPv4 such as 192.168.1.1 and IPv6 such as 2001:db8::1, without ports, masks or CIDR suffixes.
  • Plausible Phone Numbers: 7–15 digits, optional leading +, common spaces, parentheses, dashes, dots and slashes; extensions using ext., x or Durchwahl are supported. This checks plausibility, not actual allocation or reachability. Short emergency numbers do not pass as regular phone numbers.
  • Integers: digits with an optional + or -, without decimal or grouping separators.
  • Decimal Numbers: decimal point or comma, common thousands groups using apostrophes, spaces, points or commas, and scientific notation such as 1.2e-3. Examples: 1234.56, 1’234.56, 1.234,56, 1,234.56. Whole numbers also pass as decimal numbers. Values are checked without reformatting.
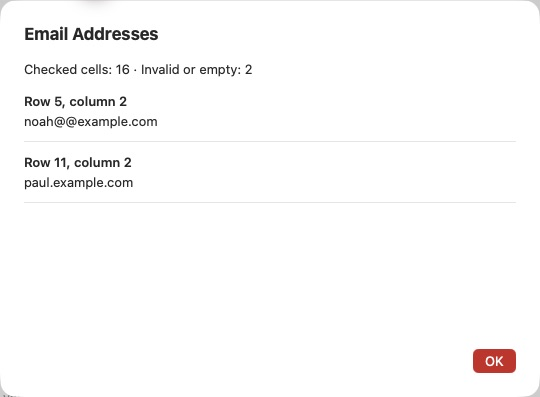
Email validation report: 16 cells checked, with two invalid values in rows 5 and 11, both in column 2.
The report lists questionable values and their cell positions. Validation does not change any content.

Shortcut through the column menu: Double-click the desired title and choose a check under Validate Column. All seven checks are available here; a defined header row is always excluded.

Standardize case

For columns: Click a data cell to use its column, or select several column titles with Shift or Command. Choose Data Maintenance → Change Case in Active Column → Uppercase or Lowercase. When several columns are selected, the menu is called Change Case in Selected Columns and processes all data cells in those columns. Checked rows do not restrict this column action.

For rows: Select the desired rows using their numbers or checkboxes, then choose Data Maintenance → Change Case in Selected Rows → Uppercase or Lowercase. This processes all existing cells in those rows, regardless of any column selection. If no rows are checked, Change Case in Active Row uses the active cell’s row.

Through context menus: Click the ellipsis (⋯) on an already selected column or row, or right-click its title or number. Change Case also uses the corresponding multiple selection; for several items, the menu name specifies selected columns or rows. Right-clicking an unselected item offers the action for that item alone. Use the ellipsis or a right-click to preserve a multiple selection: an ordinary click on a title or number would replace it with a single selection.

A defined header row is always preserved, even if checked. If only the header is selected, the row action is disabled. Without an enabled header, the first row is treated as ordinary data. Empty cells stay empty and shorter rows are not padded with extra cells.

The report shows the count, contents and positions of cells that actually changed. Command-Z undoes the entire action across all affected rows or columns; Shift-Command-Z redoes it. Commands in Data Maintenance are available only while input focus is in the grid. They are disabled when the cursor is in the search field, for example.

Convert special characters globally

Choose a target under Data Maintenance → Convert Special Characters in Entire Table. Every cell is processed, including headings. Feedback lists changed contents; ⌘Z undoes the entire conversion.

  • Unicode (hex): numeric character references, for example ä → ä.
  • Unicode (decimal): decimal references, for example ä → ä.
  • HTML Entities: common named entities such as ä, & and <, with numeric references for other characters.
  • Control Character Escapes: actual line breaks and tabs become visible sequences such as \n, \r and \t. Existing backslashes are doubled to distinguish them from escapes. Unicode line separators use forms such as \u{2028}.
  • URL Encoding (UTF-8): encodes each cell as one URL component. ä becomes %C3%A4 and a space %20; /, ?, & and % are also encoded. Use this for values within URLs, not to preserve a complete web address.
  • Mail Encoding (Quoted-Printable): represents UTF-8 bytes as =XX for MIME content, for example ä → =C3=A4. Long lines receive soft breaks. This does not create an email or encode a subject header.

Numeric references and HTML entities convert non-ASCII characters, control characters and HTML-sensitive characters including &, <, > and quotation marks. Ordinary letters, digits and spaces remain intact. These actions change stored cell contents, not just their appearance. Reapplying an encoding may encode existing escapes again.