Columns and table structure
Add, delete, split, and move columns while protecting saved originals with copies.
Select columns and open their actions
Click a column title once to highlight the entire column in yellow. Click it once again to deselect it. Each selected column shows its drag handle and ellipsis button (⋯). The sort arrow is always visible and controls sorting separately.
Double-clicking a column title selects it and immediately opens its menu. The ellipsis and a right-click open the same menu. It contains structure commands, Validate Column, whitespace and line-break cleanup, nonbreaking spaces and Change Case. Change Case includes other selected columns when you open the menu on a selected column. Other actions target the column whose menu you opened. Checked rows do not limit these column actions.
To edit an existing heading, choose Edit Column Heading or press Return after clicking its title. Without an enabled header row, the column bar shows generated labels. Clicking a data cell clears the column selection and begins editing.
Multiple selection: Hold Shift and click another column title to select the range between your anchor and the clicked item. Further Shift-clicks can expand or shrink that range. Command-click adds or removes individual items. Command-Shift-click adds a range to the existing selection.
An unmodified click replaces a multiple selection with the clicked item. If it is already the only selected item, the click deselects it. Change Case includes all selected columns. Other menu commands and the drag handle still act on that specific column.
Why a copy?
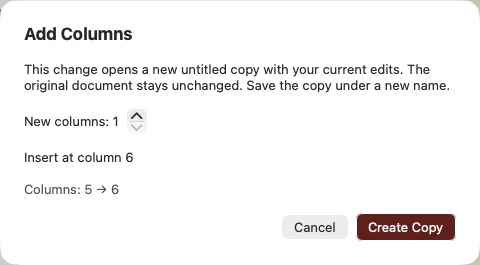
Columns define a CSV file’s structure. For an already saved file, adding, deleting, splitting, or moving columns therefore opens a new untitled copy. It includes the current table contents, including unsaved cell edits. The operation does not change the original document. Review the change in the dialog and click Create Copy.
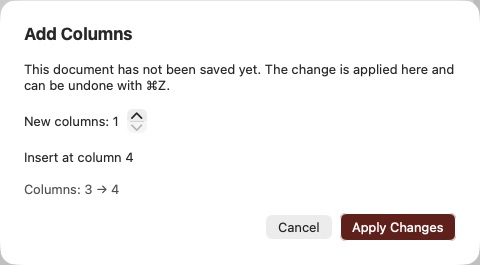
Documents that have not been saved yet are changed directly. This applies both to new files and to freshly created copies. The dialog offers Apply Changes in this case. Further column changes do not open additional windows and can be undone with ⌘Z.
Save the copy with ⌘S under a new name. After this first save, the next structural change creates a copy again. Cancel leaves everything unchanged. A new copy starts without an active sort or the original’s editing history. Moving rows, by contrast, changes the current document even if it has already been saved.
Add or delete columns
To append columns, choose Table → Add Columns… or use the Columns toolbar menu. You can add 1 to 100 empty columns per operation.
To choose a position, right-click a column heading and choose Insert Column Before… or Insert Column After…. To remove a column, choose Delete Column… there. The dialog identifies the column. For a saved file, Create Copy removes its heading and values only from the new copy. For an unsaved document, Apply Changes changes the document directly and can be undone with ⌘Z.
At least one column must remain; the last column cannot be deleted. For CSV rows of different lengths, missing cells are filled with empty values. Existing values remain attached to their columns.
Split a column at its first whitespace
Use Split Column… to separate a value such as “Anna Maria Smith” into “Anna” and “Maria Smith”.
- Open the desired column’s ellipsis menu or right-click menu and choose Split Column…. Alternatively, click a cell in that column and use the command in Table or the Columns toolbar menu.
- Read the dialog. Choose Create Copy for a saved file, or Apply Changes for a new or still-unsaved document.
- A new column appears immediately to the right of the original column. Other columns shift right.
Each cell is split at its first consecutive run of whitespace. This includes ordinary and nonbreaking spaces, tabs, line breaks and other Unicode whitespace. Consecutive whitespace characters form a single separator and are removed. Text before it stays in the original column; text after it goes into the new column. Later spaces and line breaks remain unchanged. For example, “Anna Maria Smith” becomes “Anna” and “Maria Smith”.
Cells without whitespace stay unchanged on the left, with an empty cell on the right. Leading whitespace gives an empty left part; trailing whitespace gives an empty right part. A whitespace-only cell becomes two empty cells. An enabled header row follows the same splitting rule. If a heading contains no separator, the new heading is empty and can be edited afterwards.
If no cell in the chosen column contains whitespace, a message explains that no new column will be created. The action targets that one column and all its rows; other selections do not restrict it.
For a saved file, the original stays unchanged and a new untitled copy includes your current edits. Further structural changes in a document or copy that has not been saved yet are applied directly there. Command-Z undoes the whole split in such a document; Shift-Command-Z redoes it.
Move columns
First select the column by clicking its title to reveal its drag handle.
Using drag and drop: Drag the handle with three vertical lines at the left of a column heading onto the desired target heading. The target column is outlined. The dragged column is inserted at that position and intervening columns shift accordingly. All values and the heading move together. For a saved file, the Create Copy dialog appears. In a document that has not been saved yet, the column moves directly; ⌘Z undoes the move. Dragging between document windows is not supported.
Using the keyboard or menus:
Right-click the desired column heading. Choose Move Column Left… or Move Column Right…. Confirm with Create Copy for a saved file, or Apply Changes for a document that has not been saved yet. The entire column, including its heading and all values, moves by one position. Row order is preserved.
Alternatively, click a cell in the column and use the commands under Table or in the Columns toolbar menu. The corresponding direction is disabled at the left or right edge. To move by several positions, repeat the command in the unsaved document or newly created copy. No additional copy is created until you save it.
Use nonbreaking spaces
A nonbreaking space looks like an ordinary space. In many applications, it prevents an automatic line break at that position, for example within “Anna Maria” or “10 kg”. Existing line breaks are not removed.
- Open the column’s three-dot menu (⋯) or right-click its heading.
- Choose Replace Spaces with Nonbreaking Spaces. The command is also available in the toolbar’s Columns menu and under Table, after clicking a cell in the desired column.
- The feedback shows the number of changed cells and the affected cell contents. Ordinary and nonbreaking spaces look the same; the list uses no special markers. The accompanying row numbers help identify each cell and include a header row if present.
The action replaces every ordinary space (U+0020) in the data cells of this column with a nonbreaking space (U+00A0), regardless of checked rows. The header, other columns, tabs and existing nonbreaking spaces stay unchanged. This changes cell contents only, so it does not create a structural copy. Use ⌘Z to undo the whole action and ⌘S to save the change.